I'm breathing a big, happy sigh of relief today. The past 8 months have been extremely busy and stressful for me -- mainly because of rigorous work demands. Then when that finally calmed down, my oldest daughter had a health scare that required a medical procedure. Thankfully she is fine now! I feel like I can finally take a little breather for a while. I'm hoping to spend the next few months recharging my battery a bit.
Here is a rainbow card I made using the new Queen & Co. washi tapes and gems.
It was a little hard to photograph because of the white on white letters (cut with My Favorite Things dies), but you get the picture.
Tuesday, May 20, 2014
Wednesday, April 30, 2014
The first of many rainbow layouts and cards
I've always loved rainbow-colored layouts and cards, and recently I got on a huge rainbow kick when I was asked to design projects for Queen and Co.'s booth at CKC and the Scrapbook Expo. Here is one of many rainbow scrapbook pages I created.
I used Queen and Co's new washi tapes, buttons and gems to compliment a big black and white photo.
Thursday, April 24, 2014
The Four of Us
A quick little share for the day . . .
I used Queen and Co.'s new bling and flowers. I'm in love with these new felt flowers!
Monday, April 14, 2014
Corset Card
Happy Monday, everyone! Need a cute card or invitation for a bridal or bachelorette shower/party? Here's a cheeky card I made using Queen & Co's new Glitter Studs, Rock Candy and twine.
My daughters saw this card after I finished it and they both immediately said "Ewwwwwwww . . . that's inappropriate!!" Yes, my little girls, keep thinking that until you're adults and married. ;)
To make the corset, I used a template I found through Pinterest (gotta love Pinterest!). Pinterest took me to this downloadable template posted on Filckr: CORSET TEMPLATE If you scroll through the Flickr photos, you can find the various parts and sizes along with the instructions. The Flickr page says this template was created by "Valerie", and a Google search led me to conclude that her full name is Valerie Brincheck. Hopefully this is the proper credit for this adorable corset template.
This corset would be cute for a Valentine's Day or Anniversary card too, don't ya think?
Labels:
ATC,
bachelorette,
bridal shower,
card,
corset,
corset template,
download,
invitation,
Queen and Co.
Tuesday, April 1, 2014
"Magic" cards
Queen & Co.'s Magic collection isn't just for Disney scrapbook layouts. I used the products to make a couple of cards. Both of the cards are somewhat generic, but I was thinking of Minnie Mouse's skirt when I made the paper ruffles on the first card below.
That's all for today!
Wednesday, March 26, 2014
Disney layouts with Queen and Co.
I've been busy creating scrapbook layouts and cards for Queen & Co's booth at the Scrapbook Expo and CKC events this year. Here are some projects I made with Queen's & Co's adorable new Magic line.
Do you have some Disney or Disneyland photos that you need to scrapbook? Be sure and check out Queen & Co's Magic papers and embellishments!
Tuesday, February 25, 2014
Butterflies
I have one more My Creative Scrapbook kit layout to share. For a while now I've had an idea in my head for using a small butterfly punch on a scrapbook layout. When I saw the ombre Crate Paper "Love Note" paper in the kit, I knew it would be perfect for what I had in mind. Here's the result:
It's always a pleasure guest designing for My Creative Scrapbook because the monthly scrapbook kits are always so darn beautiful. The icing on the cake is that most of the kits include a pack (sometimes two!) of Prima flowers - - a "must have" in my book! You can purchase the kits here: My Creative Scrapbook
Tuesday, February 18, 2014
Watercolor pencil tutorial
I have another My Creative Scrapbook Main Kit project to share. I've been noticing lots of watercolor paper craft projects on Pinterest lately, and it's inspired me to play around with watercolors myself.
I prepared a quick little tutorial on a basic watercolor technique. There are several watercolor mediums you can use: watercolor paints, water soluble pigment sticks, watercolor crayons or pencils, and watercolor papers (like the Peerless ones). Watercolor mediums that require water work best with watercolor paper, but you can use regular patterned paper and cardstock as well (just be prepared for a little warping).
I’m going to show you how I used watercolor pencils to create the watercolor background on my layout. Watercolor pencils look like normal colored pencils, but when water is added to them, they give the beautiful appearance of watercolors. I bought my watercolor pencils individually at my local art store. That way I was able to choose colors that “sang” to me, rather than be limited to the colors that come in watercolor pencil sets.
1. I gathered my paper, watercolor pencils, and a water brush. If you don’t have a water brush, a paintbrush will do.
2. I drew circles with the watercolor pencils.
3. Using the watercolor brush, I added water to the colored circles.
4. Once I finished my first go-around on the circles and let them dry a bit, I went back and added a little more intense color around the edges of the circles. I added a little more water to blend the color. This was the finished result.
5. With all the water added, the paper warped quite a bit. To diminish the warping, I adhered my watercolored paper to a piece of heavy cardstock, then I placed it under something flat and heavy overnight. And voila . . . vibrant color!
Monday, February 10, 2014
Love This Girl
Here's another layout I made with the My Creative Scrapbook February Main Kit featuring Crate Paper's Love Note papers.
I created a patchwork heart using bits and pieces of patterned paper, then I adhered the lace trim around the edge. To add to the homespun feel of the page, I backed the patchwork heart with cardstock and then crocheted around the edge. Here's a close-up.
Have a "love"-ely week!
I created a patchwork heart using bits and pieces of patterned paper, then I adhered the lace trim around the edge. To add to the homespun feel of the page, I backed the patchwork heart with cardstock and then crocheted around the edge. Here's a close-up.
Thursday, February 6, 2014
Guest Designing at My Creative Scrapbook
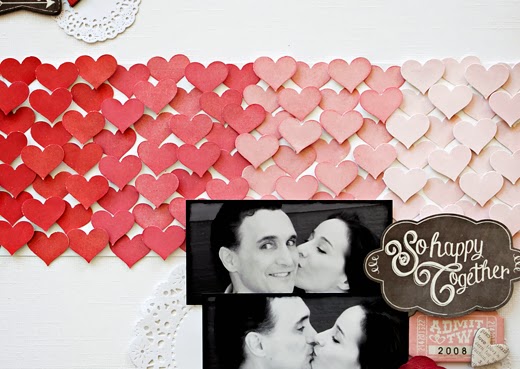
I'm guest designing again this month for My Creative Scrapbook. I always enjoy being a Guest DT for My Creative Scrapbook because Pam's kits are always stunning!! I got to play with February's beautiful Main Kit, which is filled with Crate Paper and Prima goodies. Here's one the layouts I created with the kit:
I created an ombre heart background by punching hearts from the Crate Paper Love Notes paper in the kit.
It was inpsired by an ombre heart cake I saw on Pinterest:
Check back again to see the rest of the layouts I made with the gorgeous My Creative Scrapbook kit!
I created an ombre heart background by punching hearts from the Crate Paper Love Notes paper in the kit.
It was inpsired by an ombre heart cake I saw on Pinterest:
Check back again to see the rest of the layouts I made with the gorgeous My Creative Scrapbook kit!
Monday, February 3, 2014
A quick share for the day
Here's another layout I created for Queen & Co.'s booth at CHA using the new Darling Divas collection.
I added did a little machine stitching and crocheted the border.
I made the flowers using My Favorite Things dies and patterned paper from the Darling Divas collection. The leaves were also made with MFT dies.
I added did a little machine stitching and crocheted the border.
I made the flowers using My Favorite Things dies and patterned paper from the Darling Divas collection. The leaves were also made with MFT dies.
Thursday, January 30, 2014
CHA projects for Queen & Co.
I had the pleasure again of designing some projects for Queen & Co.'s booth at CHA (Craft and Hobby Association) a few weeks ago. Have you seen the new 2014 Queen & Co's products? They have some
fabulous new paper lines and adorable new embellishments! I got to play with the new girl line called Darling Diva. The colors and the patterns are awesome! Here are a couple of the projects I created.
I'll be back with another layout soon!
Here's a close up of my stitched circles filled with some the new Queen & Co. embellishments:
A card:
I'll be back with another layout soon!
Tuesday, January 7, 2014
13 from 2013
Happy New Year everyone! 2013 was a year of change for me with regard to my scrapbooking and crafty priorities. Early in the year I lost my creative mojo quite a bit, and I realized that I needed to cut back and focus more on other things in my life. After a three month hiatus from scrapbooking (during which I was quite busy with work-work -- my "day job"), I'm ready to get back to crafting again . . . but on a smaller scale and with fewer commitments and deadlines. I might even try (gasp*) Project Life this year. I'll see how it goes. No pressure on myself! Whatever crafty endeavors I take on in 2014, my priorities are going to be family, friends and health (I'm going to join a gym and start working out for the first time in 12 years!).
I realize I didn't blog very often last year. In fact, I probably have a couple dozen projects that I never got around to posting. Here is a sampling of some of my projects from last year -- 13 from 2013:
I hope your New Year is starting off with a bang!
I realize I didn't blog very often last year. In fact, I probably have a couple dozen projects that I never got around to posting. Here is a sampling of some of my projects from last year -- 13 from 2013:
Friday, December 13, 2013
Dancing With the Stars
Tap, tap, tap, . . . is this thing on? Is anyone still reading here? I've been working non-stop the past couple of months (my "day job"), so I haven't had any time to scrapbook or blog. In order to avoid this blog dying a slow death, I wanted to pop on and share a scrapbooking layout. This is a Hanukkah layout I did for the November/December issue of Creating Keepsakes magazine.
As seen in Creating Keepsakes magazine. Copyright Creative Crafts Group. Published with prior permission from the publisher.
The journaling reads:
It’s a ritual that’s occasionally seen but rarely captured on camera. No, it’s not the mating dance of the North American Yellow-bellied Sapsucker. Rather, it’s the traditional Cohen Family Hanukkah dance. Shhhhh . . . if we’re very quiet, we might be able to catch a glimpse of them in action. According to anecdotal evidence, this Hanukkah dance tradition goes back to the days when the Cohen girls were babies. The Cohen parents wanted to get the girls into the spirit of Hanukkah, so every night after lighting the menorah, they would put on Hanukkah music and dance around the living room with the girls in their arms. This tradition continued when the girls began walking. Within a few years, Hanukkah became an all out dance-a-thon. We aren’t talking about low key, graceful dancing. Nahhhh, that’s for sissies. We’re talking about anything goes, build-up-a-sweat-crazy-chicken dancing. Those Cohen girls sure do have rhythm! The Cohen parents . . . not so much. But they have oodles of fun despite their wacky dancing skills. It’s an annual holiday tradition that the whole family looks forward to. And look, even Grandma is getting into the act! It’s usually just the immediate Cohen family members who participate in this ritual, but if you happen to be invited to the Cohen house for Hanukkah dinner, you’d better bring your dancing shoes!!
Happy Holidays, everyone!!
Friday, November 1, 2013
Happy Halloween
Hi everyone! I've been taking a break from scrapbooking and blogging lately, thus the lack of blog posts last month. For the past 7+ years I've been passionate about scrapbooking, but lately I've lost some of that passion. I wrote more about it in this blog post: Finding Balance. I hope I'll get my scrapbooking mojo back again, but for now I'm giving myself permission to take some time off and refocus my priorities.
My job has been very busy lately and it's going to get even busier during the next six weeks, so that's been cutting into my free time. I stepped down from the Fancy Pants design team recently so I could lighten my load a bit. I'll keep doing occasional assignments for Creating Keepsakes and Queen & Co. (as long as they'll have me!) because I really enjoy doing the freelance scrapbooking design work.
I have a whole bunch of layouts to share, so I will be uploading them here from time to time. Here's a Halloween layout I created for Queen & Co using their adorable new Trendy Tapes and embellishments. I wrapped the Queen & Co straws with the twine to create the zig zag border.
These photos of my girls are from Halloween 2007. They were so little back then! Sigh . . . I miss those days. Luckily they're still young enough to go trick-or-treating with us. They got quite a candy haul last night!! I'm tempted to go sneak a Reese's Peanut Butter cup. I don't think they'll notice . . .
Subscribe to:
Posts (Atom)
.jpg)