I took it easy in December and didn't scrap as much as I normally do. For me -- the slowest scrapper in the world -- that means taking just a couple days off at a time. Since I didn't have too many projects due in December, I got to take my own sweet time on my layouts and other projects. I've been working on the same layout for four nights straight now, and I'm still not done with it (this is actually the way I LOVE to scrap . . . slow and easy). But it's time to start getting my 'rear in gear' again because I have lots of projects that I need to work on in January. In the meantime, I have a Graphic 45 layout to share:
CHA is right around the corner, and Graphic 45 has three new fabulous lines coming out!! You can see some of the sneak peaks on the Graphic 45 blog. I just received a box full of the new papers, and WOWEE . . . wait until you see them! Here's a little sneak peak of the new Le' Romantique line:
How about an A Million Memories January kit sneak peak?? This one is sooooooooooo pretty!!! Lots of Websters Pages and Prima goodies:
I'm stalking my mailman because I know my kit is in the mail! I'll hopefully have some kit creations to share with you in the next couple of weeks.
Thanks for stopping by!!!!
Tuesday, December 29, 2009
Sunday, December 20, 2009
Shimmerz has some big news!
I'm very excited about some FUN things Shimmerz has in the works!!
There's going to be a big announcement just in time for Winter CHA 2010. I can't spill the beans just yet, but I can tell you that it's going to include a BIG new release and BIG name in the scrapbooking industry! Check back here and on the Shimmerz blog for the updates.
Also, Shimmerz was just featured on the Scrapbook Trends blog! Go check it out!
There's going to be a big announcement just in time for Winter CHA 2010. I can't spill the beans just yet, but I can tell you that it's going to include a BIG new release and BIG name in the scrapbooking industry! Check back here and on the Shimmerz blog for the updates.
Also, Shimmerz was just featured on the Scrapbook Trends blog! Go check it out!
Friday, December 11, 2009
Creating Keepsakes Guest Blogger!!!!
I have some fun news to share . . .
I'm the Guest Blogger on the Creating Keepsakes blog today! I was so thrilled when they asked me to create a special Hanukkah post and layout for their blog! Go take a peek at my "Handmade Menorahs" layout. I've included a step-by-step tutorial on how to add pretty pleated ruffles to your pages. You can also read about a fun little Hanukkah gift giving tradition that my husband and I do every year. Hint: it involves the 99 Cents Store. Head on over there now! Here's the link: http://creatingkeepsakesblog.com
I'm also happy to share that I have two layouts in the current issue (December 2009) of Creating Keepsakes. You can find my layouts on pages 24 and 53:
Does this cover look familiar? Yes, it's the same one that I made a "mini me" version of for my dollhouse in my last blog post:
This is my first time being published in Creating Keepsakes, so I'm very excited! I'll have more layouts in the next several issues of the magazine. Thank you, Creating Keepsakes!
And if you haven't picked up an issue of Creating Keepsakes in while, you really should!! The magazine is better than ever, with lots of great techniques and oodles of fabulous and inspiring layouts.
Thanks for stopping by!!
I'm the Guest Blogger on the Creating Keepsakes blog today! I was so thrilled when they asked me to create a special Hanukkah post and layout for their blog! Go take a peek at my "Handmade Menorahs" layout. I've included a step-by-step tutorial on how to add pretty pleated ruffles to your pages. You can also read about a fun little Hanukkah gift giving tradition that my husband and I do every year. Hint: it involves the 99 Cents Store. Head on over there now! Here's the link: http://creatingkeepsakesblog.com
I'm also happy to share that I have two layouts in the current issue (December 2009) of Creating Keepsakes. You can find my layouts on pages 24 and 53:
This is my first time being published in Creating Keepsakes, so I'm very excited! I'll have more layouts in the next several issues of the magazine. Thank you, Creating Keepsakes!
And if you haven't picked up an issue of Creating Keepsakes in while, you really should!! The magazine is better than ever, with lots of great techniques and oodles of fabulous and inspiring layouts.
Thanks for stopping by!!
Thursday, December 10, 2009
Home Sweet Home -- handmade dollhouse
I've always had a fascination with dollhouses and miniatures. I bought a plain wooden house a while back and I've been saving it for the right project. Last week I was finally ready to dive in. I gathered up some Prima goodies, fabric, Shimmerz, lots of buttons, lace and other little odds and ends and I went to work. Here is my Home Sweet Home:


Here are some of things I did to make my little Home Sweet Home:
*I first painted the entire house with acrylic paint (white on the walls and trim, and sandy beige for the floors).
*I covered the outside and some of the inside walls with Prima paper.
*I made the bed and the chairs out of the packaging from Prima flowers. I added little Prima pearls and rhinestones.
*I glued buttons onto the roof and I "Shimmerzed" and glittered the chimney.
*I made the curtains out of fabric and made the rods out of pieces of wooden dowels.
*I made the bedspread and the pillows out of fabric. Thank goodness for Fabritac!!
*I made the bed skirt out of lace.
*To make the lamp shade, I took a strip of Prima paper and created tiny pleats, then I glued the ends together. I added a little rod and stuck it into a gold button base.
*I glued a stack of white buttons together to make the bases for the table. For the table tops, I covered chipboard circles with Prima paper.
*I sprayed the downstairs rug and the bedspread fabric (originally a light tan color) with pink Shimmerz Spritz for a little extra color and shimmer.
*I cut a piece of a Prima felt border and I painted it with Hi Ho Silver Shimmerz Blingz, then I added the jeweled center.
*I printed out a tiny copy of our family photo and put it in a mini metal K&Co frame to hang on the wall. Yep, that's us!!
*I computer printed the "Home Sweet Home" sign and put it in a frame to hang on the downstairs wall.
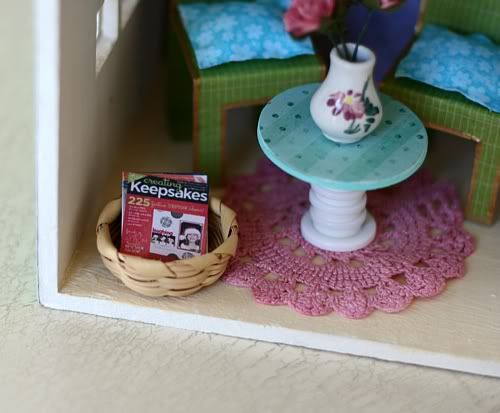
*I scanned the cover of my favorite scrapbooking magazine and printed out a tiny version of it to put in the basket.
*I put a few mini Prima flowers in a vase that I "borrowed" (shhhhhh . . . don't tell) from my daughters' dollhouse.
I can't tell you how much fun I had creating this little house!! I'm ready to move right in!
Here are some of things I did to make my little Home Sweet Home:
*I first painted the entire house with acrylic paint (white on the walls and trim, and sandy beige for the floors).
*I covered the outside and some of the inside walls with Prima paper.
*I made the bed and the chairs out of the packaging from Prima flowers. I added little Prima pearls and rhinestones.
*I glued buttons onto the roof and I "Shimmerzed" and glittered the chimney.
*I made the curtains out of fabric and made the rods out of pieces of wooden dowels.
*I made the bedspread and the pillows out of fabric. Thank goodness for Fabritac!!
*I made the bed skirt out of lace.
*To make the lamp shade, I took a strip of Prima paper and created tiny pleats, then I glued the ends together. I added a little rod and stuck it into a gold button base.
*I glued a stack of white buttons together to make the bases for the table. For the table tops, I covered chipboard circles with Prima paper.
*I sprayed the downstairs rug and the bedspread fabric (originally a light tan color) with pink Shimmerz Spritz for a little extra color and shimmer.
*I cut a piece of a Prima felt border and I painted it with Hi Ho Silver Shimmerz Blingz, then I added the jeweled center.
*I printed out a tiny copy of our family photo and put it in a mini metal K&Co frame to hang on the wall. Yep, that's us!!
*I computer printed the "Home Sweet Home" sign and put it in a frame to hang on the downstairs wall.
*I scanned the cover of my favorite scrapbooking magazine and printed out a tiny version of it to put in the basket.
*I put a few mini Prima flowers in a vase that I "borrowed" (shhhhhh . . . don't tell) from my daughters' dollhouse.
I can't tell you how much fun I had creating this little house!! I'm ready to move right in!
Wednesday, December 9, 2009
Prima & Shimmerz, plus an A Million Memories giveaway!
Here's another Prima layout I made. This stitched paper is so much fun to work with!
I love these photos of my hubby and daughter (the photos were taken by Melissa Walker Scott):

I used LOTS of Shimmerz on this page. I painted the edge of the stitched paper with Tickle-Me-Turquoise Shimmerz, and I used Pixie Dust Blingz on the torn paper "waves" and on the white Prima flower. I used the Prima butterfly as a mask and sprayed Sea Foam Spritz over it.


On another note, would you like to win a complete Cosmo Cricket "Jolly by Golly" crafting kit from A Million Memories?? For a chance to win, all you need to do is become a follower of the A Million Memories Blog and become a member of the A Million Memories Facebook group. You can find all the details here: A Million Memories blog.
I'm saving my favorite Prima project for last. There are lots of pictures which I'll be posting tomorrow, so check back!
I love these photos of my hubby and daughter (the photos were taken by Melissa Walker Scott):
I used LOTS of Shimmerz on this page. I painted the edge of the stitched paper with Tickle-Me-Turquoise Shimmerz, and I used Pixie Dust Blingz on the torn paper "waves" and on the white Prima flower. I used the Prima butterfly as a mask and sprayed Sea Foam Spritz over it.
On another note, would you like to win a complete Cosmo Cricket "Jolly by Golly" crafting kit from A Million Memories?? For a chance to win, all you need to do is become a follower of the A Million Memories Blog and become a member of the A Million Memories Facebook group. You can find all the details here: A Million Memories blog.
I'm saving my favorite Prima project for last. There are lots of pictures which I'll be posting tomorrow, so check back!
Tuesday, December 8, 2009
More Prima layouts to share
I used tulle behind the photos to give the page an ethereal feel:
I used Pixie Dust Shimmerz on the white flower and two different shades of green Shimmerz on the leaves:
I made an altered doll form using lots of Prima goodies -- patterned paper, lace, gems, and of course a Prima flower to top it off:
Thank you Prima and A Million Memories for sponsoring the AMM Design Team!!
Monday, December 7, 2009
Prima!!
I absolutely love Prima products, so I was so thrilled when I found out that Prima was going to sponsor the A Million Memories Design Team! That means that I got to play with some of the lovely new papers, flowers and other embellishments that they sent us. I've had a ball creating layouts and a couple other scrappy projects with my Prima goodies. I still need to finish taking pictures of everything, but here is one of my Prima creations:
I used Pixie Dust Shimmerz Blingz on the white Prima flower.
I'll be posting more of my Prima layouts and projects in the next few days!
I used Pixie Dust Shimmerz Blingz on the white Prima flower.
I'll be posting more of my Prima layouts and projects in the next few days!
Monday, November 30, 2009
Graphic 45
Just a little share for the day . . .
I love to use the vintage-looking Graphic 45 papers on non-vintage looking layouts. I made the ruffles on this page with papers from the Renaissance Faire line:

Oh, and if you read my last blog post about my first attempt at cooking a turkey, I'm happy to report that it was delicious!! My husband said it was the best turkey he's ever tasted. My girls are picky eaters, and even they loved it! The stuffing . . . not so much. You win some, you lose some . . . right?
I love to use the vintage-looking Graphic 45 papers on non-vintage looking layouts. I made the ruffles on this page with papers from the Renaissance Faire line:
Oh, and if you read my last blog post about my first attempt at cooking a turkey, I'm happy to report that it was delicious!! My husband said it was the best turkey he's ever tasted. My girls are picky eaters, and even they loved it! The stuffing . . . not so much. You win some, you lose some . . . right?
Wednesday, November 25, 2009
Happy Thanksgiving!!
Thanksgiving is almost here! I'm doing something I've never done before: I'm cooking Thanksgiving dinner for my little family. I have to confess that I don't like to cook and I don't do it as often as I should. The thought of cooking a whole turkey is VERY intimidating to me, but I've been gathering tips and recipes for days now so I *think* I'm ready to jump in. My biggest fear is that I will undercook the turkey or do something to it that will give my family a stomach ache, so I'm being careful to follow all the thawing and cooking precautions. I think I've got that part figured out. What I'm not quite sure about is the actual recipe. I'm going to experiment with different spices and seasonings . . . kind of a mish mash of a couple different recipes and recommendations. I know I should probably follow one recipe my first time, but I figure that I'd throw caution to the wind! I have my fingers crossed, but just in case things don't go quite as planned, I'm keeping the phone number for the local pizza place close by.
If my turkey dinner doesn't go quite as planned, that's okay. Thanksgiving is more about family than it is about the food, and as long as I have my family with me, I'll be a happy camper. I am so thankful for my wonderful family. And I'm thankful that we have our health and a roof over our heads (knock on wood).
On this day of giving thanks, I also want to say thank you to all of you who come visit my blog. And thank you so much for the sweet comments. Your comments are much appreciated and they always brighten my day!! THANK YOU!!!!


If you celebrate Thanksgiving, I hope it's filled with lots of love and fun!
If my turkey dinner doesn't go quite as planned, that's okay. Thanksgiving is more about family than it is about the food, and as long as I have my family with me, I'll be a happy camper. I am so thankful for my wonderful family. And I'm thankful that we have our health and a roof over our heads (knock on wood).
On this day of giving thanks, I also want to say thank you to all of you who come visit my blog. And thank you so much for the sweet comments. Your comments are much appreciated and they always brighten my day!! THANK YOU!!!!
If you celebrate Thanksgiving, I hope it's filled with lots of love and fun!
Wednesday, November 18, 2009
Prima goodness and Shimmerz Design Call announcement
Happy Wednesday! Everyone who knows my scrapbooking style knows that I absolutely looooooooooove Prima!! Almost every page I do has at least one Prima product on it (usually more). Well, I decided to play along with Prima's October Build a Page challenge, and I made this layout based on the monthly sketch. Everything on this layout is made by Prima:

The colors in these new Prima paper lines totally sing to me!
On another note, Shimmerz just announced a Design Team call! If you love working with shimmery, sparkly mists and paints, this is a GREAT team to be on! Here are the details: Shimmerz Design Team Call. Go check it out!
The colors in these new Prima paper lines totally sing to me!
On another note, Shimmerz just announced a Design Team call! If you love working with shimmery, sparkly mists and paints, this is a GREAT team to be on! Here are the details: Shimmerz Design Team Call. Go check it out!
Monday, November 16, 2009
Mini chipboard frames from the A Million Memories November kit
The A Million Memories November kit comes with a pack of adorable American Crafts mini chipboard frames. If you like to add fun little details to your pages, these frames have a lot of potential. I posted a list of ideas on the AMM message boards. Here are some examples:
1. Use them as picture frames like I did on this layout:
2. Use one as a base or frame for your title:
3. Back the frame with a piece of a dictionary page, then add an embellishment (in this case I added one of the Prima pebbles from the kit):
4. Cut out a specific word from a dictionary page:

5. Add Stickles or glitter:
6. Paint it and top with Glossy Accents, then add rhinestones:
7. Fill it with mini pearls or seed beads and add a title. For this one, I painted the frame and added Glossy Accents. Then I filled the center with mini pearl beads (adhered with glue). I used a “Happy Birthday” rub-on on a transparency, cut it out, and then I glued it on top of the beads. Now I have a cute greeting to add to handmade birthday card:
1. Use them as picture frames like I did on this layout:
2. Use one as a base or frame for your title:3. Back the frame with a piece of a dictionary page, then add an embellishment (in this case I added one of the Prima pebbles from the kit):

4. Cut out a specific word from a dictionary page:


5. Add Stickles or glitter:

6. Paint it and top with Glossy Accents, then add rhinestones:

7. Fill it with mini pearls or seed beads and add a title. For this one, I painted the frame and added Glossy Accents. Then I filled the center with mini pearl beads (adhered with glue). I used a “Happy Birthday” rub-on on a transparency, cut it out, and then I glued it on top of the beads. Now I have a cute greeting to add to handmade birthday card:

8. Wrap embroidery floss around the frame:
Check out the A Million Memories design team gallery and see the other ways the talented ladies used these cute frames!!
Check out the A Million Memories design team gallery and see the other ways the talented ladies used these cute frames!!Thursday, November 12, 2009
Graphic 45
Whew! It's a very busy week. We went to Santa Barbara for a few days to celebrate my husband's and my daughter's birthdays. It was the first family vacation we've taken in a very long time. A good . . . no, make that a GREAT . . . time was had by all! Now I'm busy planning for my daughter's birthday party this weekend. We're doing a small party with just a handful of her friends, but it's still a lot of prep work (cleaning the house, getting the party favors, decorations, and food, planning activities, etc.). I also need to pick up stuff for her classroom birthday celebration later today. Plus I have a gazillion phone calls to return at work today. Calgon . . . take me away!
But before I jump into the tasks of the day, here's a layout I made with papers from Graphic 45's Renassaince Faire line. I just love my little girls!! They really are my world!


Thank you so much for stopping by! Have a great day!!
But before I jump into the tasks of the day, here's a layout I made with papers from Graphic 45's Renassaince Faire line. I just love my little girls!! They really are my world!
Thank you so much for stopping by! Have a great day!!
Monday, November 9, 2009
Creative Cuts and More Blog Hop!!!
If you've come here for the Creative Cuts & More Mega Recipe Blog Hop, you're in the right place! Welcome!! Today is the first day of the Blog Hop, which features the 8”x8” Treasured Family Recipes Album. There are 24 designers who have created wonderful pages to inspire you. Plus we are all sharing some of our own delicious recipes. If you've already visited the previous blogs on today's list, I'm sure your mouth is watering!
If you didn't arrive via the CC&M Mega Recipe Blog Hop and you want to play along, head over to www.diecutdiva.com so you can get the instructions and start from the beginning.
I have to confess that I'm not a very good cook (though I make a mean macaroni and cheese from scratch). I do love to bake, so I decided to share a couple yummy brownie recipes with you. Here are my album pages from the fabulous Treasured Family Recipes kit:


Everything you need comes in the kit, except for adhesive and recipes. I added the ribbon and mini red stones.
And here are the recipes:
Super Duper Fudge Brownies
• 1 cup butter
• 4 (1 ounce) squares unsweetened chocolate
• 2 cups white sugar
• 3 eggs
• 1 cup all-purpose flour
• 1 teaspoon vanilla extract
• 1/2 teaspoon salt
• 1 12 oz. bag semi-sweet chocolate chips
1. Preheat oven to 350°. Grease a 9x13 inch baking pan.
2. In a small saucepan over low heat, melt the butter and chocolate. Stir until blended. Remove from heat and add the sugar. Allow the mixture to cool slightly. Beat in the eggs one at a time, then add the vanilla. Combine the flour and salt and add to the chocolate mixture (don’t over mix at this point). Fold in half of the chocolate chips. Pour batter into the prepared pan. Sprinkle the remaining chocolate chips on top of the batter.
3. Bake in oven about 25-35 minutes or until a toothpick inserted into center comes out clean. Let cool completely and cut into squares.
Toffee Brownies
• 2 sticks butter
• 4 (1 ounce) squares unsweetened chocolate
• 1 tsp vanilla
• 2 cups sugar
• 4 large eggs (not extra large or jumbo)
• 1 1/4 cup flour
• 1 tsp baking powder
• 1/2 tsp salt
• 1 bag chocolate chips
• 1 package of toffee bits (Skor Bar Bits) on top.
1. Preheat oven to 350°. Grease a 9x13 inch baking pan.
2. In a med saucepan over low heat, melt butter, unsweetened chocolate and vanilla. When melted, turn off heat and mix in sugar and eggs.
3. In a separate bowl mix flour, baking powder and salt. Add in chocolate mixture, then fold in chocolate chips.
4. Pour into baking pan and sprinkle toffee bits on top of batter.
5. Bake for 30 minutes.
As a continuing part of the celebration, CC&M is giving away great prizes. All you need to do is go through the blog hop and leave comments on every blog. After you have finished the blog hop, return to www.diecutdiva.com and instead of leaving a comment, you need to share a recipe to have a chance at winning a prize. Share the recipe on your blog and link it back and get another chance to win the prize!
Be sure and check back at www.diecutdiva.com tomorrow for the Holiday Treats Apron Recipe Album Blog Hop. There will also be 24 designers who will be showcasing their great creations and sharing holiday recipes.
Now head on over to Pam Smerker's blog and see what she has in store for you!!
If you didn't arrive via the CC&M Mega Recipe Blog Hop and you want to play along, head over to www.diecutdiva.com so you can get the instructions and start from the beginning.
I have to confess that I'm not a very good cook (though I make a mean macaroni and cheese from scratch). I do love to bake, so I decided to share a couple yummy brownie recipes with you. Here are my album pages from the fabulous Treasured Family Recipes kit:
Everything you need comes in the kit, except for adhesive and recipes. I added the ribbon and mini red stones.
And here are the recipes:
Super Duper Fudge Brownies
• 1 cup butter
• 4 (1 ounce) squares unsweetened chocolate
• 2 cups white sugar
• 3 eggs
• 1 cup all-purpose flour
• 1 teaspoon vanilla extract
• 1/2 teaspoon salt
• 1 12 oz. bag semi-sweet chocolate chips
1. Preheat oven to 350°. Grease a 9x13 inch baking pan.
2. In a small saucepan over low heat, melt the butter and chocolate. Stir until blended. Remove from heat and add the sugar. Allow the mixture to cool slightly. Beat in the eggs one at a time, then add the vanilla. Combine the flour and salt and add to the chocolate mixture (don’t over mix at this point). Fold in half of the chocolate chips. Pour batter into the prepared pan. Sprinkle the remaining chocolate chips on top of the batter.
3. Bake in oven about 25-35 minutes or until a toothpick inserted into center comes out clean. Let cool completely and cut into squares.
Toffee Brownies
• 2 sticks butter
• 4 (1 ounce) squares unsweetened chocolate
• 1 tsp vanilla
• 2 cups sugar
• 4 large eggs (not extra large or jumbo)
• 1 1/4 cup flour
• 1 tsp baking powder
• 1/2 tsp salt
• 1 bag chocolate chips
• 1 package of toffee bits (Skor Bar Bits) on top.
1. Preheat oven to 350°. Grease a 9x13 inch baking pan.
2. In a med saucepan over low heat, melt butter, unsweetened chocolate and vanilla. When melted, turn off heat and mix in sugar and eggs.
3. In a separate bowl mix flour, baking powder and salt. Add in chocolate mixture, then fold in chocolate chips.
4. Pour into baking pan and sprinkle toffee bits on top of batter.
5. Bake for 30 minutes.
As a continuing part of the celebration, CC&M is giving away great prizes. All you need to do is go through the blog hop and leave comments on every blog. After you have finished the blog hop, return to www.diecutdiva.com and instead of leaving a comment, you need to share a recipe to have a chance at winning a prize. Share the recipe on your blog and link it back and get another chance to win the prize!
Be sure and check back at www.diecutdiva.com tomorrow for the Holiday Treats Apron Recipe Album Blog Hop. There will also be 24 designers who will be showcasing their great creations and sharing holiday recipes.
Now head on over to Pam Smerker's blog and see what she has in store for you!!
Friday, November 6, 2009
A Million Memories kit layouts
Happy Friday!! I'm sharing the layouts I created with the beautiful A Million Memories November kit. I love the mix of Prima, Basic Grey and Pink Paislee papers in this kit.


Here is a layout I created featuring a picture of my grandparents from the year 1918. I really need to do more of these heritage pages. I think they'll be a special treasure for my kids and for their kids.


And last but not least, here's a page featuring pictures of me and my oldest daughter. I used Sea Foam Shimmerz Spritz and a butterfly mask on white cardstock.

I created a little instructional tutorial on A Million Memories with some tips on different ways to use the mini chipboard frames that came with the kit. You can find the tutorial here.
One another note, I'm going to be participating in a fun blog hop on Monday and Tuesday, so be sure and check back!
Here is a layout I created featuring a picture of my grandparents from the year 1918. I really need to do more of these heritage pages. I think they'll be a special treasure for my kids and for their kids.
And last but not least, here's a page featuring pictures of me and my oldest daughter. I used Sea Foam Shimmerz Spritz and a butterfly mask on white cardstock.
I created a little instructional tutorial on A Million Memories with some tips on different ways to use the mini chipboard frames that came with the kit. You can find the tutorial here.
One another note, I'm going to be participating in a fun blog hop on Monday and Tuesday, so be sure and check back!
Tuesday, November 3, 2009
More Cosmo Cricket
As I mentioned in an earlier post (see my "Know This" layout a couple blog posts down), Cosmo Cricket recently sponsored the A Million Memories design team. Thank you, Cosmo Cricket!!! I got to play with papers from the Earth Love collection. Here are the other projects I made with these fun papers:


And here's a little card I made:

Thanks for stopping by!!
And here's a little card I made:

Thanks for stopping by!!
Subscribe to:
Posts (Atom)