javascript:void(0)
Showing posts with label scrapbooking. Show all posts

Monday, July 8, 2013

Tombow Blog Hop and a GIVEAWAY!

If you've arrived here via the Tombow Blog Hop, then you're in the right place!  If you came here via a different route and you want to join the Blog Hop, head on over to the Tombow USA blog to start at the beginning.

I'm thrilled to be the Guest Designer for Tombow this week!  Tombow MONO Adhesive tape runners (regular, dots and clear) are my go-to adhesives.  I can only guess how many of them I've gone through over the 8+ years I've been scrapbooking. 100s of them, I'm sure!

Here is a layout I created using a variety of fabulous Tombow products.


I used the Stamp Runner, Dot Pattern Adhesive and my faithful MONO Adhesive Permanent to adhere the photo, the paper strips, and the lace.  I used the Foam Tabs along the bottom edge of the paper strips to give each layer dimension.  I fussy-cut the flowers and leaves from patterned paper, then I adhered the outer edges of the petals and leaves with the Foam Tabs to give them dimension.


I adhered the chipboard frame and the roses with Mono Aqua Liquid Glue.  For the title word "LOVE", I colored white chipboard alphas with a pink Dual Brush Pen, then I coated the letters with white glitter.

Of course it wouldn't be a blog hop without a giveaway, right?!?  Simply leave a comment here for a chance to win this Tombow prize package:

The more blogs you comment on along the Hop, the more chances you have to win! Be sure to check out all the blogs below to see what kind of craftiness they have in store! The winner will be announced Friday, July 12th  at 3:30pm ET on the Tombow USA blog.

Stacy Cohen (you are here!!): http://stacycohen.blogspot.com/

Thanks for playing along and good luck!!  

Tuesday, July 2, 2013

Another My Creative Scrapbook kit layout and a tutorial

Ahhhhhh . . . sweet summer!!  I really love this time of year.  The kids are out of school, we get to sleep in, and life feels a little less stressful than normal.  I'm on a laid back summer schedule and I'm definitely taking some time to relax and smell the roses (and sunscreen!).  I guess that's why I haven't blogged in a couple weeks.

I realized that I forgot to post one of the layouts that I made with the fabulous My Creative Scrapbook June LE kit. It features paper and die-cuts from Crate Paper's DIY Shop collection.


I created a tutorial showing how I made the layered patterned paper waves on this layout.  
 
1.  Cut a piece of cardstock that is the approximate size you want your wavy paper block to be.  I cut mine to 7” wide because I wanted it to align with the edges of my 5” x 7” photo.  

Grab a pencil and a flexible ruler (if you have one). 

2.  Draw horizontal curvy lines from top to bottom.  Note:  You don’t need a flexible ruler to draw the curvy lines; you can easily freehand draw them.

3.  Cut along the curvy lines.  These pieces will be your cutting templates.  It helps to number them so that you can choose the order of the patterned paper pieces to cut.

4.  Use the wavy sections as templates to trace and cut the curvy sections from patterned paper.  This is a great way to use up your scraps!!

5.  Once you’ve traced and cut all the curvy sections, you can ink or stitch the edges, if desired.

6.  Cut another piece of cardstock the same width as the first piece you cut and use it as the base for the wavy paper pieces.  Adhere the wavy paper pieces to the cardstock starting from top to bottom, slightly overlapping each piece.  Cut off any excess cardstock on the bottom.   You can always go back and add some more wavy layers if you want to make your paper block taller.

And VOILA!

I handstitched along the edges of my curves. And of course I had to add some pretty flowers.

I hope you enjoyed this scrapbooking tutorial!

Tuesday, October 23, 2012

Queen & Co. -- Fun with washi tape and twine

Washi tape and bakers twine are hot, hot, hot right now in the scrapbooking and cardmaking worlds.  Queen & Co. has a HUGE selection of both these popular items.  Check out Queen & Co.'s Trendy Tape and Twine Twist.  I recently had the pleasure of designing some projects with Queen & Co's newest tapes, twine, and rhinestones.

First up is a layout I created. I cut out stars in varying sizes, then I placed the Trendy Tape (aka washi tape) on another sheet of cardstock behind the openings. 


I outlined the stars with the twine. 


When I finished the layout, I had the cut-out stars left over.  I didn't want them to go to waste, so I used them to make a card.  I covered them with strips of Queen & Co's Trendy Tapes, then I matted each star on black cardstock. I added a rainbow of twine and rhinestones.


These bright colors make me very happy! 

Wednesday, February 29, 2012

Prima: Ruby Violet

Have you seen Prima's new(ish) Ruby Violet collection?  This whimsical collection is very different from Prima's usual style, but I love this one too!  The papers and embellishments are fun and colorful.  Here's a Ruby Violet layout I made featuring my girls in the pool:


Here's a close-up of the patchwork:


The Ruby Violet collection includes an array of funky trinkets that are great for making jewelry and altered projects.  Here are a few pieces of jewelry I made:


Fun stuff, that Ruby Violet!

Monday, June 7, 2010

Blowing Bubbles and Dreyer's Ice Cream

Happy Monday everyone!  Here's a layout I created using more of Lily Bee's "Lovely" papers.  My daughters love to hang out in our backyard and blow bubbles.  There's something so simple yet magical about blowing bubbles, don't you think? 


I cut strips of paper and placed them where I wanted them on the page, then I cut out circles of varying sizes.  I filled the circles with the fun Lily Bee chipboard pieces and topped them with Prima flowers and rhinestones.  I used Shimmerz paint and Spritz to color the Prima flowers.

I saw a fun beading technique on Lollychops' fantastic blog, and I decided to give it a try.   I embroidered around the circle and added seed beads as I stitched.   Lolly did it on fabric and felt, and I figured that it would work just as well on paper.


And one other thing to share today.  This is something that makes me VERY happy.  I have a nightly ritual . . . after we put our girls into bed and I settle down for some "me" time, I have a small bowl of Dreyer's Light ice cream.  As I mentioned a few posts ago, our old fridge/freezer has been on the fritz for a while, so I've had to contend with soft, mushy ice cream every night . . . which is NOT the way I like it.  We finally got a new refrigerator a couple days ago, and the freezer works like a charm!   The first thing I did was go out and stock up on my favorite Dreyer's ice cream flavors.  Here's a little glimpse . . .
Do you think maybe I went a little overboard??   Anyhow, it makes me happy to open the freezer and see all the SOLID -- not mushy -- ice cream in there!  Ahhhhhh . . . the little pleasures in life.

Have a fantastic week!!!

Monday, March 15, 2010

Happy Birthday to my not-so-little girl and some AMM kit layouts to share

Today is my oldest daughter's 8th birthday.  Seriously?  I'm saying this in the same intonation as my now 8-going-on-15-year-old daughter would say it (with a little bit of teen-like attitude thrown in):  SERIOUSLY??  Where in the world does the time go??   This morning as we were standing side-by-side in front of the bathroom mirror getting ready together (I swear she grew another inch last night while she slept!), I remembered our morning routine when she was a little baby . . . I used to set up a soft blanket and baby toys on the bathroom rug next to me, and she would happily play alongside me while I got ready.  Time flies!  Before I know it she'll be off to college.  *sigh*   In any event, it's shaping up to be a nice birthday for her.  We made her breakfast in bed, and then I'm bringing donuts to school for her class birthday celebration.   We'll have a nice birthday dinner tonight, and then I need to start preparing myself for her slumber party this coming weekend.  Happy Birthday, my sweet girl!

Turning to scrappy stuff, here are the layouts I made with the A Million Memories March kit:

I added some Prima flowers and colored them with Shimmerz paint and Spritz.

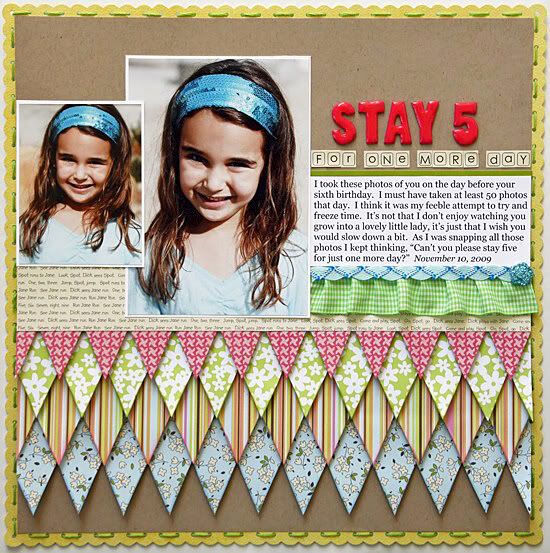
This next layout features pictures of my younger daughter on the day before her 6th birthday last year:
The journaling on this "Stay 5" layout says:  I took these photos of you on the day before your sixth birthday. I must have taken at least 50 photos that day. I think it was my feeble attempt to try and freeze time. It’s not that I don’t enjoy watching you grow into a lovely little lady, it’s just that I wish you would slow down a bit. As I was snapping all those photos I kept thinking, “Can’t you please stay five for just one more day?” 

This last one was based on the monthly sketch created by the very talented Rachel Hall:

Thanks for stopping by! Have a great week!

Wednesday, March 3, 2010

Velvet pinwheel tutorial

I haven't blogged much lately because I've been busy working on some things that I can't post yet, so I thought I'd share a simple little tutorial I put together for A Million Memories last May.
Materials needed:
-velvet ribbon or fabric
-needle and thread
-embellishments for the center of the pinwheel (optional)

Start with a piece of velvet ribbon.  For this example, I used velvet ribbon that was about 3/4 of an inch wide and I cut a piece that was about 6 inches long.  The length you’ll need will depend on the width of the velvet and how tight you want your spiral to be. 

1.    Take the threaded needle and stitch along one edge of the velvet:
 
2.  After you’ve stitched along the entire edge of the ribbon (see the photo above), pull your thread to gather the velvet:
3.  Keep pulling the thread until the entire edge of the velvet is gathered as tight as it will go.    The gathered velvet will form a little pinwheel (see below).  Just stitch up the loose ends and tie a knot in the thread: 

You can also use velvet fabric, but you’ll probably want to cut it along the edge of the fabric so that you have a crisp edge (just stitch along the edge you’ve cut). 

Once you’ve finished the pinwheel, you can add anything you want to the center – rhinestones, pearls, buttons, a dab of Stickles, flowers, etc.  And there you go!!

Thanks for stopping by!!

Wednesday, January 13, 2010

Exciting Shimmerz News!

Shimmerz has some FUN news and a new product release!! Check out the video below:

Yes, Shimmerz had teamed up with Teresa Collins for a fabulous new product release called Pearlz!

How would you like to win a set of the new Pearlz? Shimmerz is going to be giving away one complete set of Shimmerz Pearlz every hour for the next 12 hours! (10am - 10pm MST).  Head on over to the Shimmerz blog for all the details!!

Sunday, December 20, 2009

Shimmerz has some big news!

I'm very excited about some FUN things Shimmerz has in the works!!

There's going to be a big announcement just in time for Winter CHA 2010. I can't spill the beans just yet, but I can tell you that it's going to include a BIG new release and BIG name in the scrapbooking industry!  Check back here and on the Shimmerz blog for the updates.

Also, Shimmerz was just featured on the Scrapbook Trends blog!  Go check it out!

Friday, November 6, 2009

A Million Memories kit layouts

Happy Friday!! I'm sharing the layouts I created with the beautiful A Million Memories November kit. I love the mix of Prima, Basic Grey and Pink Paislee papers in this kit.


Here is a layout I created featuring a picture of my grandparents from the year 1918. I really need to do more of these heritage pages. I think they'll be a special treasure for my kids and for their kids.


And last but not least, here's a page featuring pictures of me and my oldest daughter. I used Sea Foam Shimmerz Spritz and a butterfly mask on white cardstock.


I created a little instructional tutorial on A Million Memories with some tips on different ways to use the mini chipboard frames that came with the kit. You can find the tutorial here.

One another note, I'm going to be participating in a fun blog hop on Monday and Tuesday, so be sure and check back!

Monday, September 28, 2009

Pencil Lines Guest Designer!!

I am so honored to be the guest designer for Pencil Lines this week!! I created the weekly sketch and a layout to go along with it. Head on over there and see my sketch along with the fabulous layouts created by their talented design team. Here is my layout:


The papers are from Webster's Pages' Postcards from Paris line (one of my all time favorite paper lines!). I added some crocheting and lots of sparkle and bling.


I used the new Shimmerz fall vintage colors: Treasured Hymn and Antique Lace on the Prima felt border, and Rock-a-fella blue and Sapphire Spritz on the flowers and butterfly.

Thank you Pencil Lines and Anna for having me as a guest designer! And thank you again to Webster's Pages (Brandin and Terri) too!! This has been a great month!

Friday, September 25, 2009

More Webster's Pages

My month as the guest designer for Webster's Pages is slowly coming to an end, but I'm still busy creating scrapbook pages and other things with the gorgeous papers they sent me! Here are a couple more projects I just completed:


I used the peacock feather as a mask on white cardstock. I placed the feather on the cardstock and sprayed over it with Shimmerz Spritz. I used Sea Foam and Sapphire Spritz:


Here is a little card I made with fabric swatches and the dress form that I cut from the Postcards from Paris paper:


These little squares were cut from some fabric swatches sent to me by Lucy Edson after I won one of the monthly challenges on The Next Step challenge blog. I got a package filled with the most beautiful variety of fabrics. Thank you, Lucy!

I still have lots of beautiful Webster's Pages paper to play with, so you'll be seeing more projects here over the coming months!