Friday, December 13, 2013

Dancing With the Stars

Tap, tap, tap, . . . is this thing on?  Is anyone still reading here?  I've been working non-stop the past couple of months (my "day job"), so I haven't had any time to scrapbook or blog.  In order to avoid this blog dying a slow death, I wanted to pop on and share a scrapbooking layout. This is a Hanukkah layout I did for the November/December issue of Creating Keepsakes magazine. 

As seen in Creating Keepsakes magazine.  Copyright Creative Crafts Group.  Published with prior permission from the publisher.

The journaling reads:

It’s a ritual that’s occasionally seen but rarely captured on camera. No, it’s not the mating dance of the North American Yellow-bellied Sapsucker.  Rather, it’s the traditional Cohen Family Hanukkah dance.  Shhhhh . . . if we’re very quiet, we might be able to catch a glimpse of them in action. According to anecdotal evidence, this Hanukkah dance tradition goes back to the days when the Cohen girls were babies. The Cohen parents wanted to get the girls into the spirit of Hanukkah, so every night after lighting the menorah, they would put on Hanukkah music and dance around the living room with the girls in their arms. This tradition continued when the girls began walking. Within a few years, Hanukkah became an all out dance-a-thon. We aren’t talking about low key, graceful dancing. Nahhhh, that’s for sissies. We’re talking about anything goes, build-up-a-sweat-crazy-chicken dancing. Those Cohen girls sure do have rhythm! The Cohen parents . . . not so much. But they have oodles of fun despite their wacky dancing skills. It’s an annual holiday tradition that the whole family looks forward to. And look, even Grandma is getting into the act! It’s usually just the immediate Cohen family members who participate in this ritual, but if you happen to be invited to the Cohen house for Hanukkah dinner, you’d better bring your dancing shoes!! 

Happy Holidays, everyone!!

Friday, November 1, 2013

Happy Halloween

Hi everyone! I've been taking a break from scrapbooking and blogging lately, thus the lack of blog posts last month.  For the past 7+ years I've been passionate about scrapbooking, but lately I've lost some of that passion.  I wrote more about it in this blog post: Finding Balance.  I hope I'll get my scrapbooking mojo back again, but for now I'm giving myself permission to take some time off and refocus my priorities. 

My job has been very busy lately and it's going to get even busier during the next six weeks, so that's been cutting into my free time.  I stepped down from the Fancy Pants design team recently so I could lighten my load a bit.  I'll keep doing occasional assignments for Creating Keepsakes and Queen & Co. (as long as they'll have me!) because I really enjoy doing the freelance scrapbooking design work.

I have a whole bunch of layouts to share, so I will be uploading them here from time to time.  Here's a Halloween layout I created for Queen & Co using their adorable new Trendy Tapes and embellishments.  I wrapped the Queen & Co straws with the twine to create the zig zag border.


These photos of my girls are from Halloween 2007.  They were so little back then!  Sigh . . . I miss those days.  Luckily they're still young enough to go trick-or-treating with us.  They got quite a candy haul last night!!  I'm tempted to go sneak a Reese's Peanut Butter cup.  I don't think they'll notice . . .

Monday, September 30, 2013

Mixed Media special issue winner + an MFT layout

First off, I want to announce the winner of Creating Keepsakes' new Mixed Media, Vol. 2 special issue.  Based on the random number generator, the winner is . . . JJ Meyer!!  Congrats!  I will try and contact you through your blog to let you know you've won and to request your mailing address (or if you see first, send me an email with your info). 

I had the pleasure of guest designing for My Favorite Things (MFT) this month.  They make so many fabulous stamps and dies!! I posted one of my MFT layouts in a blog post below.  Today I'm sharing another layout I made with some of the awesome MFT stamps and dies.


I love these new Chalkboard Frame Builder Die-namics:


MFT Products used:
Stamps: MPD Blooming Roses
Die-namics: MPD Rose Bouquet, Mini Royal Roses, Mini Rolled Roses, Dainty Doily Duo, High-Rise Alphabet Lower Case, Chalkboard Frame Builder
Cardstock: Heavyweight Smooth White

Thanks for stopping by!

Thursday, September 26, 2013

Another Mixed Media blog hop

Welcome to another fun blog hop to celebrate the release of Creating Keepsakes' awesome special issue:  Mixed Media, Volume 2.  Thank you, sweet Liz, for organizing this blog hop!

Here's a snippet of a layout I created for the "Collage" section of the magazine.


I created the "She Art"-type paper doll on this layout, which appears on page 112 of the magazine.  You can download my hand-drawn collage doll here:  Collage paper doll template.  Just print it out, cut the body and dress sections apart, then trace and cut!  One of the collage techniques I did on this page was stamping with paint on bubble wrap and painter's tape.  While the paint was still wet, I sprinkled on glitter to give the patterns some extra texture and sparkle.

The magazine is filled with tips, techniques, and step-by-steps from some of the most talented designers in the scrapbooking and crafting industries.  One of the ideas I loved was Sherry Mendoza's technique for creating resist patterns using stencils, everyday white glue (like Elmer's) and spray ink. Very cool!!  You can see Sherry's awesome technique and layout on page 31 of the magazine.

Here is the list of today's blog hop participants:

Liz Hicks (The wonderful organizer of this blog hop!) 
Stacy Cohen (Me!) 
Kim Watson

And in case you missed it, here are yesterday's blog hop participants:
Liz Hicks
Noel Culbertson
Ronda Palazzari
Angela Magnuson
Marion Smith
Sharon Laakkonen
Terri Anderson
Candy Rosenberg

Be sure and check out the blogs of all of these incredibly talented artists, and don't forget to order your copy of  Mixed Media, Vol. 2 (available in both digital AND paper format). There's still time to leave a comment on my blog post below for a chance to win a copy of this issue.

Friday, September 20, 2013

Creating Keepsakes Mixed Media Special Issue and a Giveaway

Creating Keepsakes' newest special issue is out: Mixed Media, Vol. 2.  This special issue of FULL of wonderful ideas for using color mediums, modeling mediums, fabric, collage, metallics, and more!  Best of all, there are easy to follow instructions for the techniques shown in the issue.

Create beautiful works of art that preserve and showcase your family memories using your scrapbooking skills, diverse art mediums, and the ideas in this follow-up to the popular first volume last year. From chalk to paint, fabric to metal, we'll show you how to get amazingly artistic looks for your pages with creative and clever techniques. And with plenty of step-by-step tutorials, quick ideas you can use in minutes, and colorful photos, you'll feel confident in trying new materials and mediums on your layouts.

Here is a layout I made for the "Metallic" section of the magazine.


I created the flourishes using flourish stamps, embossing ink, Ranger's Sticky Embossing Powder, and platinum glitter.  


You can see some more sneak peaks: Mixed Media, Vol. 2, and you can purchase a copy here: online store.

I get to give away a copy of this special issue to one lucky blog reader. Leave me a comment here by the end of the day on Friday, September 27th and you could be randomly chosen to win. (International winners, you’ll be given a download for a PDF version of the magazine.)

For more chances to win and to see more projects created for this issue, head on over to the blogs of these very talented ladies: 

Mou Saha
Riikka Kovasin 
Cindy Tobey
Ashley Horton
Susan Weckesser
Kim Watson
 

Lastly, hop on over to the CK blog for another giveaway!

Friday, September 13, 2013

My Favorite Things

I'm thrilled to be the Guest Designer for My Favorite Things this month!  Besides great stamps, MFT has an incredible variety of steel dies called Die-namics.  I use my manual die-cutting machine ALL the time (on just about every single project), and Die-namics are my go-to dies. I'm in love with all their flower, flourish and doily dies!

Here's a layout I created using a variety of MFT flower and flourish dies and stamps.


Stamps: MPD Blooming Roses 
Die-namics: MPD Rose Bouqet, Mini Royal Roses, Mini Rolled Roses, Layered Rose, Leaf-Filled Flourish, Leafy Flourish, By the Letters 
Cardstock: Heavyweight Smooth White 

Every single flower on this page was created with one of the Die-namics dies.


I tried My Favorite Things' Heavyweight Cardstock for the first time.  I die-cut the flat roses and the title letters with it.  It's my new favorite cardstock for die-cutting!!  The dies cut through the cardstock easily with one pass through the machine, yet there's just enough extra weight to give the die-cut some firmness.  I cut the alphas using the By the Letters die.  The cardstock is firm enough that I was able to glitter it using wet glue (no warping!) and then pop up the letters with 3D adhesive.

I'll have another MFT layout to share later in the month!

Tuesday, August 27, 2013

Finding Balance

If you've been following my blog, you might have noticed that I haven't been posting as much over the past few months. I've kind of reached the burnout phase when it comes to all the "technical stuff" that goes along with scrapbooking -- blogging, write-ups, tutorials, editing photos, posting, social media, etc. One thing I've learned about myself is that what I really enjoy is just sitting in my scrap room and playing with pretty paper and pretty products and making pretty things.  Like many other scrapbookers, I took on too many scrapbooking commitments over the past several years (not a wise move for a VERY slow scrapper like me), and I found my life driven by scrapping deadlines. Always having something due took the fun out of the creative process.  So I've been trying to find more balance in my life and get back to a place where scrapping is fun again. I'm giving myself permission to say "no" to new DT offers and to take little breaks from blogging/posting from time to time.

All that being said, I absolutely LOVE working with Creating Keepsakes magazine. It's always been a true joy, and I will stay on their Dream Team as long as they'll have me. I have quite a few CK projects that I haven't shared yet. I wrote an article for the March/April 2013 issue of the magazine called "Accentuate the Negative".  The article showed many ways to spotlight the negative space on your pages.  Here's the layout I created for the article.

"Happy, Happy, Joy, Joy", as seen in the March/April issue of Creating Keepsakes magazine.  Copyright Creative Crafts Group.  Posted with prior permission from the publisher.
 
I cut out circles and filled the cut-out cavities (the negative space) with a rainbow of colorful embellishments.  I colored the edges of the circles with ink and chalk to add emphasis. 


Have a happy, joy-filled week!

Tuesday, July 16, 2013

CK Summer Camp and a misting tutorial

It's that time of year again . . . Creating Keepsakes is hosting Summer Camp on the Creating Keepsakes blog this week!  There are challenges, prizes, downloads, tutorials, and lots of inspiration.

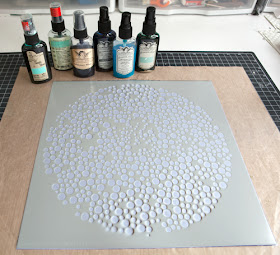
I was asked to create a layout using color mediums.  Of course, I happily obliged!  I used a stencil and spray ink to create the ombre background on this layout.


Supplies: Cardstock: American Crafts and Bazzil Basics Paper; Vellum paper: TPC Studio; Stickers and badge: American Crafts; Stencil: The Crafter’s Workshop; Die cut and stamp: Elle’s Studio; Spray Ink: Canvas Corp.; Ink: Clearsnap; Glitter: EK Success; Die-cutting machine and embossing folder: Sizzix; Dies: Cottage Cutz and Sizzix; Adhesive: Beacon Adhesives, and Tombow; Font: Franklin Gothic; Other: Corrugated cardboard and museum board.
It’s so easy to create this colorful ombre background.

1.  Grab a large stencil.  I used one made by The Crafter’s Workshop.

2.  Gather several coordinating colors of spray ink and a sheet of cardstock.

3. Place the stencil over the cardstock and start spraying from the top to the bottom, using varying shades from the same color palette to create an ombre look.   Note:  Although there are 6 bottles of spray ink shown in the photo above, I ended up using only 4 different colors, ranging from blue to aquamarine.


Here’s the finished product.

If you’ve worked with mists, you know that they tend to warp the paper.  To flatten the paper, I let it dry completely, then I placed it under something flat and heavy overnight.  Sometimes I even iron my misted papers (on a very low heat setting, obviously!).

Variation:
-Make your own decorative stencil using an electronic die-cutting machine.
-Instead of spray ink, you can use regular ink (apply over the stencil using a dauber), scrapbooking chalks, paint, etc.

Now head on over to the Creating Keepsakes blog where you can find details about the Color Mediums Challenge and the prize you can win!  Be sure to visit the Creating Keepsakes blog daily this week to see all the fun challenges, prizes, downloads, and inspiration!

Monday, July 8, 2013

Tombow Blog Hop and a GIVEAWAY!

If you've arrived here via the Tombow Blog Hop, then you're in the right place!  If you came here via a different route and you want to join the Blog Hop, head on over to the Tombow USA blog to start at the beginning.

I'm thrilled to be the Guest Designer for Tombow this week!  Tombow MONO Adhesive tape runners (regular, dots and clear) are my go-to adhesives.  I can only guess how many of them I've gone through over the 8+ years I've been scrapbooking. 100s of them, I'm sure!

Here is a layout I created using a variety of fabulous Tombow products.


I used the Stamp Runner, Dot Pattern Adhesive and my faithful MONO Adhesive Permanent to adhere the photo, the paper strips, and the lace.  I used the Foam Tabs along the bottom edge of the paper strips to give each layer dimension.  I fussy-cut the flowers and leaves from patterned paper, then I adhered the outer edges of the petals and leaves with the Foam Tabs to give them dimension.


I adhered the chipboard frame and the roses with Mono Aqua Liquid Glue.  For the title word "LOVE", I colored white chipboard alphas with a pink Dual Brush Pen, then I coated the letters with white glitter.

Of course it wouldn't be a blog hop without a giveaway, right?!?  Simply leave a comment here for a chance to win this Tombow prize package:

The more blogs you comment on along the Hop, the more chances you have to win! Be sure to check out all the blogs below to see what kind of craftiness they have in store! The winner will be announced Friday, July 12th  at 3:30pm ET on the Tombow USA blog.

Stacy Cohen (you are here!!): http://stacycohen.blogspot.com/

Thanks for playing along and good luck!!  

Thursday, July 4, 2013

Happy 4th of July!

Happy 4th of July!  I have a 4th of July post up on the Creating Keepsakes blog today. I found a bunch of  red, white and blue Pinterest images to inspire your craft endeavors.  There are also some downloadable and printable 4th of July badges on the CK blog.  Go check it out!

In honor of the holiday, I created a red, white, and blue card featuring some adorable Queen & Co products.

Supplies: Cardstock: American Crafts; Patterned paper: Stampin Up!; Pinwheels, straws and twine: Queen & Co.; Stickers: Carolee’s Creations; Other: Lace and ric rac.

I hope you have a fun-filled 4th of July!

Tuesday, July 2, 2013

Another My Creative Scrapbook kit layout and a tutorial

Ahhhhhh . . . sweet summer!!  I really love this time of year.  The kids are out of school, we get to sleep in, and life feels a little less stressful than normal.  I'm on a laid back summer schedule and I'm definitely taking some time to relax and smell the roses (and sunscreen!).  I guess that's why I haven't blogged in a couple weeks.

I realized that I forgot to post one of the layouts that I made with the fabulous My Creative Scrapbook June LE kit. It features paper and die-cuts from Crate Paper's DIY Shop collection.


I created a tutorial showing how I made the layered patterned paper waves on this layout.  
 
1.  Cut a piece of cardstock that is the approximate size you want your wavy paper block to be.  I cut mine to 7” wide because I wanted it to align with the edges of my 5” x 7” photo.  

Grab a pencil and a flexible ruler (if you have one). 

2.  Draw horizontal curvy lines from top to bottom.  Note:  You don’t need a flexible ruler to draw the curvy lines; you can easily freehand draw them.

3.  Cut along the curvy lines.  These pieces will be your cutting templates.  It helps to number them so that you can choose the order of the patterned paper pieces to cut.

4.  Use the wavy sections as templates to trace and cut the curvy sections from patterned paper.  This is a great way to use up your scraps!!

5.  Once you’ve traced and cut all the curvy sections, you can ink or stitch the edges, if desired.

6.  Cut another piece of cardstock the same width as the first piece you cut and use it as the base for the wavy paper pieces.  Adhere the wavy paper pieces to the cardstock starting from top to bottom, slightly overlapping each piece.  Cut off any excess cardstock on the bottom.   You can always go back and add some more wavy layers if you want to make your paper block taller.

And VOILA!

I handstitched along the edges of my curves. And of course I had to add some pretty flowers.

I hope you enjoyed this scrapbooking tutorial!

Friday, June 14, 2013

My Creative Scrapbook

My kids are out for the summer and they are doing "Camp Mom" this week and next.  So I'm doing a quick "drive by" post today.  Here's another layout I created with the My Creative Scrapbook June Limited Edition kit.


Check out the my Creative Scrapbook Blog to see all the layouts created by the talented Design Team members!!

Have a wonderful weekend!

Monday, June 10, 2013

My Creative Scrapbook -- Guest Designer

I'm honored to be a Guest Designer this month for My Creative Scrapbook kit club!  They have the most gorgeous kits around!  I got to play with the June Limited Edition kit, which is filled with Crate Paper, Pink Paislee and Prima products.  Here are a couple of the projects I made with the kit:


And of course I had to make a pair of paper shoes to add to my collection . . .


I'll be back later this week to post the other projects I made with this gorgeous kit!

Friday, May 31, 2013

What a busy time of year!

Woo-eee . . . it's a busy time of year!!  My oldest daughter is in 5th grade and she's graduating from elementary school next week, so it's been one celebration after another.  She's had a fantastic year full of achievements and wonderful things, and I couldn't be more proud of her!!!  Both of my girls have been very busy with activities these past few weeks.  There have been school performances, ballroom dance competitions (Rebecca totally rocked it and won a gold metal!), speeches to write, field trips, room parent duties . . . you name it!  I'm not quite ready to see my not-so-little girl graduate from elementary school, but I certainly am looking forward to the lazy days of summer!

Here's a summer layout I created with Fancy Pants' Down by the Shore line.


These photos are from 2007.  Sigh . . . My girls were so little back then.  Rebecca was only in kindergarten back then, and now she's heading off to middle school!!  Where does the time go??!?  At least Danielle still has another couple years of elementary school. 

Sunday, May 12, 2013

Happy Mother's Day!

To all you mothers out there, Happy Mother's Day! I've had a wonderful Mother's Day so far.  It started with my husband and my girls making me breakfast in bed, followed by a lovely lunch at my mom's home.  Then I got to wander around the local flea market for while (blissful!).  Dinner is going to be either take out or a casual restaurant, so I don't have to cook or clean up . . . woo hoo!!

This is a card I made for my mom using Fancy Pants' Trend Setter collection. 


Hope your day has been great!

Friday, May 3, 2013

Countdown to National Scrapbook Day

Check out what's been happening on the Creating Keepsakes blog this week!  In anticipation of National Scrapbook Day ("NSD") tomorrow (Saturday, May 4th), The Dream Team, Contributing Writers, and Contributing Editors at CK have been sharing some scrap-lifted inspiration.  Everybody looked through the new May/June 2013 issue of Creating Keepsakes issue and created a new layout using a design from one of the layouts that inspired us. I chose an awesome layout by Shelly Jaquet.  Here is my scraplift:


Here is Shelly Jaquet's layout that inspired mine:

Lucky by Shelly Jaquet, as seen in the May/June 2013 issue of Creating Keepsakes magazine.

Shelly’s well-designed and colorful layout immediately caught my eye.  I love her fun spin on the current sun burst/rays trend.  She used rainbow colors for the rays and spread them across her two page spread. I decided to use the same basic design, but I flipped it upside down and shrunk it down to fit on a single page layout. I emphasized the rainbow color palette on my layout by adding color-coordinated buttons and rhinestones to my rays.

Happy NSD!!

Tuesday, April 30, 2013

Bye-bye diet soda + some Fancy Pants projects

I doing it.  I'm finally doing it.  I'm going to try to kick my diet soda habit.  I've had a major diet soda addiction for more than two decades.  I drink it every day, morning to night. Diet Coke, Diet Pepsi or Diet Rite used to be my sodas of choice, but several years ago I read that the dark colas were more harmful to your health than clear ones, so I made the "healthy" (ha!) switch to Diet 7-Up at home.  I would still have Diet Coke at restaurants.  My husband is a total health nut and for years he's been trying to convince me to stop drinking diet soda, but I wasn't willing to give it up because I craved the stuff and I figured it was my only vice.  Then something just clicked in me last week and I decided it was time to stop because I want to be healthier.

I'm on Day Four of being soda free. It's been a little tough, but I'm sticking with it so far!  7-Up is caffeine-free, so it's clearly the sweetness (aspartame) that I've been addicted to.  I'm just trying to drink a lot of water to get my body used to drinking unsweetened beverages.  Have any of you given up the soda habit?  How did it go?  Did you notice any difference after giving it up?  I'd love to hear from you!

I have a couple Fancy Pants projects to share today.  First up is a layout I made using a mix of Fancy Pants papers from several different collections.  I chose black and cream papers and embellishments, then I added a splash of hot pink and green.
 
I used the new Fancy Pants stencils to add the pink dots.  I made the roses out of white cardstock that I first sprayed with Dylusions spray ink. 

Here's a "thank you" card I made with the lovely Park Bench collection.


Last but not least, you can check out a tutorial I did for altering the cover of a Brag Book on the Fancy Pants blog.  Here's a little sneak of the project:

Thanks for stopping by!